DAJ Fine Woodworking <br />603-356-9080
  • Welcome
  • Blog "THE BOARD ROOM"
  • Architectural Millwork
    • Casework & Cabinetry
    • Entertainment centers
    • Closets
  • Furniture
  • Contractor services
    • Commercial
  • Testimonials
  • Artistic Pieces
  • Bio
  • Contact
  • For sale;
  • coverage areas

This can Be very "Flattening"

2/25/2016

0 Comments

 
One operation that seams relatively simple but is difficult to achieve is to perfectly flatten a large slab or surface. If you should have a Planner or a sander that is wide enough to get the piece through, the piece will come out with the two sides parallel but not necessarily flat. ( If the piece has a twist in it, it will come out twisted.)
The video below shows how I can flatten a large surface using my CNC Router, Depending on the degree of variation in the surface this process may take a few passes to get it perfectly flat. 
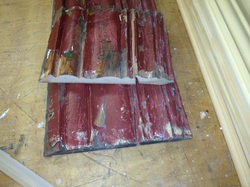
This particular piece was a older table top that the owner wanted to re-finish, so as well as flattening it I was able to remove the old finish.
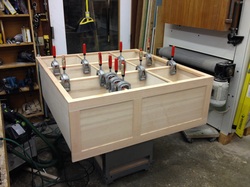
To explain what's happening here, First you need to start with a piece that is stable , ( meaning dry and acclimated to interior conditions.) 
I stabilize the piece on the machine table so it cannot move , then I take a series of traverses using a large diameter flat bottom router bit ( called a " Table Mill ") once I have the first side flat I can then flip the piece over and to the same process on the opposite side.
Now this can be sanded and finished and you have a perfectly flat top.  There may still be some deflection in the piece over time with changes in humidity and temperature.
Another very important item is that the top needs to be completely finished top, bottom, and all edges so that you can prevent moisture from penetrating into one surface more than another. This is referred to as a balanced finish.

0 Comments

what to do when you can't buy it?

4/13/2014

0 Comments

 
Picture
You call me.
Here a local well established builder needed some custom window casings to match the profile of the rest of the trim in the house cut to the radius of three radius top windows that he has installed.

Picture
He needed the trim and the extension jambs for the tops of these windows.

Picture
Here you can see the exact match to the target piece I had to work from. He should have no problem  making these radius pieces match up with the standard trim he is using.

0 Comments

Towel Cabinet with a Story

1/16/2014

0 Comments

 
Picture
I was Contacted by a General Contractor In Stowe, VT. (Steele Construction Inc.) Whom I have worked with in the past, to do a piece for one of his clients.
The Picture here is a conceptual drawing done by the Interior Designer, (Meghan Collins,Interior Designer, Allied A.S.I.D.)

Picture
This is my shop drawing sheet depicting the above furniture piece as I saw it.

Picture
The material to be used for this piece was from a company out of Lake George, NY.
("Storied Boards"). This company supplies authentic reclaimed materials and documents the history of the lumber and where it came from.
One of the challenges of using this type of material is to do so in a fashion that retains the aged patina of the lumber while making the necessary cuts required. In this shot you can see how the outside corners of the cabinet are mitred so that there are no freshly sawn edges.

Picture
This is the top corner detail. Again making Miter joints to eliminate any raw or freshly sawn edges.
This piece needs to be functional as well as look like it has been around for many years.

Picture
When you get to an edge that it is just impossible to show a raw edge (as in this tapered cut on the legs).
I took a very thin veneer strip off of a board and applied it to this raw edge.

Picture
Here is the result of the application of the veneer to the leg.

Picture
The structure of the cabinet is a carcass of maple plywood.
In the areas that are exposed but not seen I sprayed with a flat black paint so that there were no raw surfaces visible.
The other thing that is lacking from this piece is any visible fasteners, all parts are glued and clamped then allowed to set before moving on the the next pieces.

Picture
The "unfinished" finished product !
Given the fact that this cabinet is for towels I lightly sanded the exterior surfaces to smooth things out a bit and sanded a little more aggressively on the interior where the towels will be placed.
Any type of Finish would drastically change the appearance of the old wood.
Hope they like it !!!!

the Story Continues !
 a new beginning 

0 Comments

Just a little pressure here

11/17/2013

0 Comments

 
Picture
This is one portion of a much larger project for a luxury Home located in Bear foot Creek on the slopes of one of the Mount Washington Valley's premiere ski resorts Attitash Ski Area. Doing a piece like this, sometimes takes some pressure and a little patience. Kind Of like waiting for glue to dry. This unit is a cubbie unit for ski paraphernalia, hats, helmits, goggles etc. it is on it's back with the top to the right.

Picture
 A wider shot of the rest of the job in progress. There are approximately 47' of  window seating and bench type cabinetry some incorporating drawers and blanket storage.

Picture
I primarily use solid maple dovetailed drawers with under mount soft closing drawer slides in all my cabinetry.

Picture
The wood of choice for this project is clear vertical grain Fir with a clear finish. this is a finished end corner that returns to a 8" x 8" post that frames the window opening. 
Here your looking at a glued up Miter fold. 
This is still raw wood with no finish applied.

Picture
I have used this method on a few projects with good results.
This is a removable custom grill for the HVAC that needs to be located in the base of this cabinetry, the hole to the right is for an electrical outlet also mounted in the base.

Picture
With some final fitting and some finish sanding the balance of these parts and pieces will be ready for the finishing process. I apply a sealer coat, sand that with fine sandpaper, vacuum off the sanding dust , and apply 2 consecutive coats of a clear conversion varnish (all spray applied). 

Stay tuned to see how the finish brings out the richness and warmth in the wood.
0 Comments

Replicating Crown Molding & Corbels

10/26/2013

0 Comments

 
Picture
The Appalachian Mountain Club are stewards for the Crawford Notch Train Depot in Crawford Notch. The AMC's construction crew is currently making repairs to the building. This structure is part of the National Historic Register so keeping as close to original as possible is a must.
Here Is a section of the Crown molding that needed to be replaced.

Picture
In most instances you would have a cutter ground to match the profile. Then you need a machine big enough to hold the cutter. This piece is approximately 7-1/4" wide.
 Using the software that I have and the CNC router I can cut absolutely any profile using a ball nose bit. The machine traverses the stock with the bit traveling up and down to match the desired profile. The closer the passes of the bit the better the finish, the down side is the closer the passes the longer it takes to cut the part.

Picture
The other pieces they asked me to replicate were some ornamental corbels. These pieces required me to make them in two parts then glue them together. Here is the 1st cut on one side of the piece (It's difficult to see but at the bottom of the cut there is a shoulder that sticks out.)  the top of this board is what will be the inside of the corbel.

Picture
Once the inside cut was made I had to make a fixture to locate the parts on my machine table . The dark piece is a piece of 1/4" masonite cut to the shape of the back cut.  The corbels fit into this masonite piece holding them in place. Then I route the decorative details to the outside of the corbel.
There are a total of six finished corbels. In this picture you can see six rights and six lefts that get glued together.

0 Comments

Good Vibes

3/29/2013

0 Comments

 
Picture
Another example of the Mount Washington Valley Chamber of Commerce's, Chamber after hours prizes donated by The one and only DAJ./ Sawdust "n" Sparks Studious
And The Prize goes to: Good Vibes Coffee Roasters Of North Conway New Hampshire.

Picture
This is what I started with I just added another dimension to it.

0 Comments

Butterflies

3/27/2013

0 Comments

 
Picture
I'm in the process of doing a Job for a very good local general contractor. (Tamarack Construction in Jackson New Hampshire)
During this process I got butterflies, then I got over it.
And the job goes on

Picture
This panel as well as all solid wood panels need to be stained and at least a sealer put on prior to assembly into the frame, to assure that as the panel expands and contracts you don't get an unsightly unfinished line exposed.

Picture
Precision here is the key.
Looks like the Key Fits!

0 Comments

The Forrest in the Wood.

3/12/2013

0 Comments

 
Picture
We are remodeling the entryway to our home and I wanted to do something a little different while staying somewhat budget conscious.
The two walls we needed to cover form a inside corner. The wall to the left I have recessed a cabinet that will be our coat closet into the upper section of the wall.
This is were the fun begins I took a couple of sheets of Maple plywood and engraved a tree pattern into the surface, (as seen in the attached shot.)

Picture
Then with lots of patience I stained the pattern with a contrasting stain, and presto they look just like veneered inlay panels.
Here you can see the door panel that is the coat closet. The shot below is what these will look like with the finish on them.

Picture
0 Comments

Tiger woods

12/13/2012

1 Comment

 
Picture
Just Finished installing this "Tiger wood" pre- finished floor.
I wasn't sold on it as it looked in the box, but the more we put down the better it looked.

Picture
This hearth was the focal point in the room so the whole floor was layed out based on the hearth.
The boarder around the hearth was sized so that the flooring hit it exactly on each side.
This is the left side.

Picture
And this is the right side.

Picture
The other tricky aspect of this job was scribing the flooring into an existing stone chimney.
We needed to make it look like the wood grew out of the stone work.  Mission accomplished.

1 Comment

End of phase #1

11/28/2012

0 Comments

 
Picture
All the parts and pieces are sanded and prepaired for the finish. Now I go Into spraying mode.
I first apply a Lacquer based sealer that I have specially mixed to add a little bit of tint which gives the wood a little bit of a warm tone. (if I were doing a maple or something that required a "water clear" finish I would use a completely different product)
After the sealer is dry I hand sand with a 220 Grit sand paper, vacuum off the dust and spray with a Conversion Varnish. (a two part mix of varnish and catalyst as a hardener)

Picture
On the exposed facs and surfaces I actually apply two coats of the varnish, one right after the other while they are still in the spray booth.
 The finish I prefer is a "dull sheen" which gives a nice hand rubbed look but the protection of a sprayed top coat.

Picture
After the finish has a day or two to cure I install the drawer slides and drawers and this project is ready for installation.
In this case The client wanted to hold off on the door and drawer fronts, and some of the trim details till a later date.  (I'm glad that I was able to accomodate them with this, try to do that with another cabinet manufacturer) 
"So we Loaded up the Truck and moved to Beverly" Jerico that is! And after a long day this was the result.  Phase # 1 Complete.

0 Comments
<<Previous
    Picture

    author

    I've pretty much had my hands on wood for the most part of my Life. Started in High school, on Marthas Vineyard Mass.Worked under a Father and son Partnership that taught me the valuable foundation of what High End work really is.
    I've taken those fundimentals and put my own spin on things. Today (some 36 years ago as I write this )My shop is located in Northern New Hampshire, where I have followed my philosophy of doing high quality work and delivering more than the
    customer expects.

    Archives

    February 2016
    April 2014
    January 2014
    November 2013
    October 2013
    March 2013
    December 2012
    November 2012
    August 2012
    July 2012
    June 2012
    May 2012
    April 2012
    March 2012

    Categories

    All
    All Decked Out
    And We're Off
    Cherry Kitchen 11 2012
    Cherry Kitchen 11-2012
    Crescent Shaped Cabinet
    Cresent Shaped Cabinet
    Drawer Unit
    Floors
    Flying Desk
    Good Vibes
    Home Sweet Home
    Or On Depends How You Look At Things
    Trade Shows Are Us
    Wall Or Not A Wall

    RSS Feed

Powered by Create your own unique website with customizable templates.