DAJ Fine Woodworking <br />603-356-9080
  • Welcome
  • Blog "THE BOARD ROOM"
  • Architectural Millwork
    • Casework & Cabinetry
    • Entertainment centers
    • Closets
  • Furniture
  • Contractor services
    • Commercial
  • Testimonials
  • Artistic Pieces
  • Bio
  • Contact
  • For sale;
  • coverage areas

Deck the halls

3/26/2012

0 Comments

 
Picture
Well after 20 yrs in our our House It's time for a proper deck off of our bedroom.
This is something I've been thinking about for some time now.
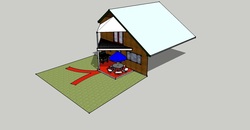
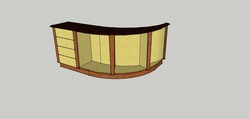
Google Sketch up was the perfect choice to show the young lady what it would look like.
I did a quick drawing of the side of our home and added the deck to it.
One of our concerns was how the deck would help shade our windows and doors on the west side of the house and with sketch up I could set up the shadows feature and see exactly what would happen at any given time throughout the year.
This is cool stuff.
Someday I'll draw the rest of the house and maybe add the shop to the drawing.
That would be a great sales tool when we decide to relocate.

0 Comments

ready for install.

3/26/2012

0 Comments

 
Picture
After spraying the sealer coat  this weekend.
Side Note: when working with cherry If it's possible I like to let it sit in the sun for awhile and tan up, It always amazes me how fast cherry will darken in the sun
I was able to get the sealer sanded and the top coat of Conversion Varnish sprayed today every thing is redy for the scheduled install tomorrow.
After I install this base section I'll double check the template for the top and get back to the shop and finish the fabrication of that part of the puzzle.

0 Comments

Back On Track

3/21/2012

0 Comments

 
I finally received some walnut that was suitable for inclusion in the Top for the cresent shaped Cabinet. Maine Coast Lumber Picked out some pretty good stuff.
Picture
Picture
Here I've picked out and machined the rough walnut prior to the initial Glue up.

Picture
This is a pretty big Curve I guess I was a little to hopeful of being able to find a single slab that would do this.
Once I get this glued up I'll let It sit till I install the base cabinet and double check my template before I cut it to size.

0 Comments

Walnut delema

3/17/2012

0 Comments

 
Unfortunately not alot of progress on the Curved Cabinet this week. We traveled to a hardwood supplier in Ashland NH.( Sharps Lumber co)  To see about finding some Walnut slabs suitable for the Top. Through phone calls and e-mails with Steve and Jamie from Sharps I knew that I wasn't going to Find one piece that would work but I was really hoping that I could make It happen with Two, Nope!
It looks like I'm going to have to resort to gluing up the pieces necessary to make the Top.  It will still look great but I had wishfull thoughts on that one special piece.

0 Comments

Skins

3/11/2012

0 Comments

 
Picture
The next order of business was to apply Cherry veneer to the flexible panels"Wacky Wood" for the curved section backs. I use spray contact cement applied to both the veneer and the wacky wood Then stick the two together, No Room For error here once these two touch they don't move.

Picture
At this stage I have trimmed the cherry nosings and sanded all the parts prior to assembly. I have pre-assembled the individual sections of the cabinet and then attached the three curved sections together to form  one unit.
I should mention here that Prior to even doing the final design, I have cut and physically checked a cardboard template to make sure that I have the correct shape. So I'm pretty confident this is going to fit.
Where this unit comes in contact with the wall I will leave myself A scribe section added to the ends that will be cut to fit the wall perfectly. As we all know that you have to asume that no wall is perfectly straight.

Next up are the solid wood pieces for the end panels and the vertical styles that will be applied to the joints where these sections come together. I do have the drawer base carcass constructed and ready to attach to this unit, but for ease of transport and installation I won't attach that section until this gets installed.
0 Comments

1st woodworking project since surgery ( OCT 19TH)

3/9/2012

0 Comments

 
Picture
This piece is one I did about one year ago. The other side of this entry way needed something that would match. After some discussions with the client we decided to do a similar piece with the addition of a bank of drawers on the left end. And the top is going to be made of walnut instead of granite.

Picture
This is a screen shot of the new design drawn using Google Sketchup ( sketch up is the program I'm basing my cad drawing classes around).


Picture
Once the design is complete I turn the individual parts into dxf. files and import them into my "Eroute software " so the parts can be nested into sheets and tool pathed for cutting on the router.
The cutting of these parts would be extremely difficult without the use of my Multicam Cnc Router, and they are all perfect, no wiggley edges etc.
In addition to the cabinet usable parts I also routed a series of parts called
"Cawls" These are matting parts that are used in the clamping process for applying equal pressure to the curved "Cherry"nosing edges for the horizontial parts of the cabinet.
Below you can see this glueing process. In an effort to do this as efficiently as possible I made my cawls so I was able to clamp two pieces at one time, virtualy cutting the clamping time in half.

Picture
Here is a shot of the toe kick ready for finish, the top section is open so when I install this I can screw it to the floor.
This is were you need to think ahead and plan these sorts of eliments into your design.  the router dosen't care how many cuts it needs to make you just need to feed it the correct info.

More to come:

0 Comments

First Post!

3/6/2012

0 Comments

 
This isn't my first introduction to blogging. I currently host a blog on my sister web site www.sawdustnsparks .com on that Blog I chronicle the exploits of the more artistic creations that emerge from the same shop where I conduct my bread and butter business of Quality Woodworking.
In this Blog I intend to Chronicle the processes involved in the many forms of woodworking that are pushed through the shop.
We'll see how staying on top of two blogs goes.
0 Comments
    Picture

    author

    I've pretty much had my hands on wood for the most part of my Life. Started in High school, on Marthas Vineyard Mass.Worked under a Father and son Partnership that taught me the valuable foundation of what High End work really is.
    I've taken those fundimentals and put my own spin on things. Today (some 36 years ago as I write this )My shop is located in Northern New Hampshire, where I have followed my philosophy of doing high quality work and delivering more than the
    customer expects.

    Archives

    February 2016
    April 2014
    January 2014
    November 2013
    October 2013
    March 2013
    December 2012
    November 2012
    August 2012
    July 2012
    June 2012
    May 2012
    April 2012
    March 2012

    Categories

    All
    All Decked Out
    And We're Off
    Cherry Kitchen 11 2012
    Cherry Kitchen 11-2012
    Crescent Shaped Cabinet
    Cresent Shaped Cabinet
    Drawer Unit
    Floors
    Flying Desk
    Good Vibes
    Home Sweet Home
    Or On Depends How You Look At Things
    Trade Shows Are Us
    Wall Or Not A Wall

    RSS Feed

Powered by Create your own unique website with customizable templates.